Selection mode
| |
|---|
The Selection mode is the main mode of Procedural Objects. From this mode you can see all the objects you have created and access all other tools that the mod contains.
Entering Selection mode
Once you're in game, the main mod button shows up in the top right corner.
- Note: you can drag the Mod button by holding the Right Mouse button and moving it
- Note: PO only works in Game and in Map editor (other specific features are available in the Asset editor - see the related documentation page).
Clicking it will open the mod window in selection mode.
Selection mode features
Interacting with POs
While in selection mode, you can interact with POs to access various tools through a menu.
- Click a single PO's + button to open the menu,
- Hold Ctrl or right-click/drag to select multiple objects at a time.
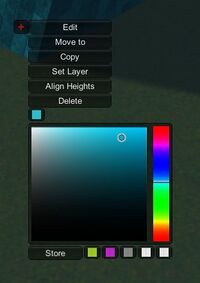
An object's menu (or a selection's menu) shows :
- Group options : see below.
- Edit (for single selection only) : enter edit mode
- Move To : grab the PO(s) to move it/them somewhere else
- Copy : copy the PO(s), use Ctrl+V to paste.
- Export (for multiple selection only) : export POs as a cross-save file
- Set Layer : set the layer of the PO(s)
- More... : open a dropdown with more tools :
- Align Heights : align the selected PO(s) heights to another PO's height.
- Align Rotations : align the selected PO(s) rotations to another PO's rotation.
- Align between 2 objects : constraint the selected PO(s) position to the line between 2 other objects
- Equal Slope : move selected PO(s) to create an equal slope between the furthest objects of the selection. Using Oriented slope will also adjust rotation to match the slope inclination.
- Snap to ground : move each selected PO directly to the ground below or above it.
- Set Render distances : set render distances for all selected POs at once.
- Replace by copy : use the copied object to replace each selected PO, only works if the copy is a single object.
- Distort : distort PO(s) by grabbing and moving 8 individual corners around the selection. Also allows grouped scaling using PageUp/PageDown
- Project : project 3D model of PO(s) onto terrain, buildings, networks, or other POs.
- Recenter Object origin : does the same as the Customization Tool option but to selections of POs
- Select Texture : select a texture to apply to the selection of objects
- Color Gradient : set the color of each object to match a gradient between two chosen colors. Uses the two furthest objects as a reference for where the gradient starts. Click an object to set its position as the beginning of the gradient (color A). Click an other one to set its position as the end of the gradient (color B)
- Delete : delete the PO(s)
- Painter box : change the color of the PO(s)
- Picker icon : picks the object in the picker filter (see section below)
In the Mod window
While in selection mode, the mod window will show the following elements :
- The Total Object Count tells you how many procedural objects are placed down on the current map. More details in the Statistics window.
The big buttons with icons let you access other Procedural Objects windows :
 Layers
 Measurements
 Exported Objects
 Texture Management
 Font Management
 Modules Management
 Render Options
 Statistics
- Filters allow you to only display the selection icons for certain types of objects : buildings, props, PO groups, decals, surfaces, and picker.
- Double click on a single type to only display this one ;
- Picker uses objects types added with the picker icon (see in dropdown menu explanation above). It can handle multiple object types, click 'X' to remove all object types from the picker
Groups
Selections of objects can be grouped. A group of object is represented by only one PO icon. It has a root object, which is the parent object that caries the main icon, and other objects are called children.
- Click Make Group with a selection of objects to create a group.
- Clicking Enter Group will enter the group and only show the objects inside it
- Click Leave Group in the window or press Esc to exit the group
- Click Change Root of group in the window to select a new root object
- Click Explode Group to separate objects
Notes :
- Groups can not contain groups themselves
- Copying or duplicating inside a group makes them belong to the group
- Groups can not be moved with the gizmos all at once


